This new set is available in the online store www.thestampingstudio.com in the sections in the store; Rubber Stamps Flowers & Foliage, READY SET STAMPS, and Flower Of The Month.


Here is a cute little window card that I came up with that we are going to create at the workshop on Saturday. Here is the front, and it actually has 3 layers.


Here is a top view that shows you all three layers.

Here is the 2nd layer which is a piece of scored cardstock glued inside the card.

This is the 3rd layer, or inside back of card.

The top layer has a layer of acetate for a "true" window effect!

We will also be adding swarovski crystals for tons of shimmer and shine!


 Mother and foal - 1.75x3
 3 Race horses - 3.5x2.25
 Wild Mustangs - 2.75x2
 Nest with eggs - 2x2
 "Peeking" bird - 2x3.25
 Baby birds - 2.25x2.25
 Owl on limb - 1.75x3.25
 Good morning stampers and scrappers,
 Small butterfly - 1.75x2.75
 Magnolia - 1.75x2.75
 Large butterfly - 3.75x2.5


 Birthday pug - 1.5x2.75
 Dog birthday party - 2.5x3 (The birthday cake reads "woof, woof"!)
 Cupcake - 1.5x1.5
 Birthday cake - 2.5x2
  Let's make a Shadow Box Card!
 Gather your supplies. Some of the items I used in this design are -
 You will need two pieces of pattern cardstock cut 4.25x5.5.
You will also need a piece of clear cellophane. I just cut a piece from the clear envelope/bag that our rubber stamp sets come in and it worked great! Take your cardstock and on the short side score it at 1"...
 And then at 1/2"...
 Do this at both ends, and also score the other piece of pattern cardstock. Both pieces of cardstock are scored exactly the same way.
 Take a bone folder and crease all of the folds.
 The top of the card should be scored like this.
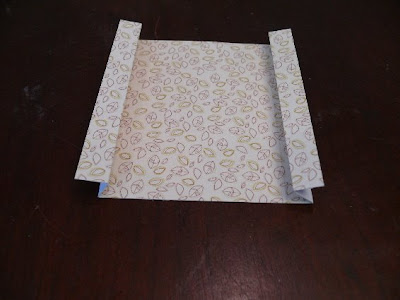 The bottom piece like so.
 Don't glue them together yet!... but this is how they will fit together to make the card.
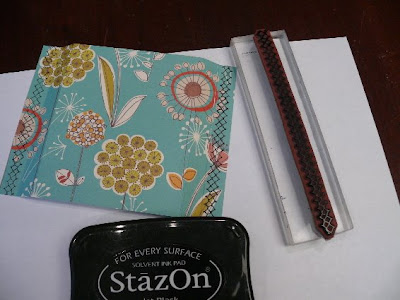 Now is a good time to stamp both ends using one of the images from the Fancy Stitches set and black ink.
 We need to cut an opening through the front of the card so we can see inside. You can do this many ways... die cuts, punches, cutting systems. I am using the Labels 2 dies from Nestabilities.
 Whala!
 This is optional, but I wanted a frame around my opening on the front of the card so I am going to use the dies again from the Nestabilities (I can order these for you) to create one real easily. First you use the die that is one size up from the one you used to create the opening in the front of the card.
Then use the size smaller inside this piece and die cut it out again. (I like to use my Cuttlebug with these dies, but you can use any similar die cut machine press) Here is the finished frame that you can glue to the front of the card.
 Looks good good and adds some more dimension.
 Now is a good time to glue the clear cellophane to the inside of the front of the card. I just used double sided adhesive for this.
 Now we can work on the inside of our card. I am using VersaMagic chalk in here in those cute little Dew Drop pads. Here I am stamping clouds (from the A Little Bird set) in Turquoise Gem ink.
 Over stamp the clouds with the saying from the Musical Quotes set and black Stazon ink.
 Also stamp a couple clouds on white scrap cardstock using Pumpkin Spice ink and trim out. We will use these in a little while.
 Now let's stamp the main image which is the bird sitting and singing on this great guitar image. This is also from out new Musical Quotes stamp set. The small Dew Drop pads are great for working on an image like this. First ink up only the notes from the birds mouth using the Turquoise Gem ink.
 Then ink up only the bird using the Pumpkin Spice ink.
 Third and final color is Jumbo Java for the guitar.
 Looks great stamped out! If you wanted the guitar image darker and more solid, add a drop or two of re-inker to your pad each time you use it. Trim this image out.
 Take one of those Pumpkin Spice clouds you trimmed out earlier and use either foam tape, or a 3d glue dot to glue inside your card as shown.
  Now you can glue the guitar/bird image to the front of the card right over the cellophane and all. I used Glossy Accents/Crystal lacquer for this but any good glue will work.
 You can take the other cloud and use foam tape to glue it to the outside of the card for some more 3D action!
 Now we can glue the card together! Place glue on the outside score lines, on each side, to glue together. Add some paper flowers and a bit of ribbon and you are done!
I hope you have enjoyed this tutorial and project. It is a pretty easy design and can be adapted to any theme or celebration and what is great about the card is that it fits in a normal size envelope for easy mailing.
Please email if you have any questions about the tutorial - melissa@thestampingstudio.com
Melissa is the owner of www.TheStampingStudio.com