Hi stampers and scrappers,
Here is the promised Inside Flapper Card Tutorial I promised, and I even used our new Flower Of The Month stamp!

You will need for paper; pink
cardstock 5.5x11 and a piece 4x5.5. White
cardstock to stamp the main image on. Pattern paper scalloped circle and pattern paper strips.
Take the pink cardstock and score it 4" 3" from that score
 And then 3" from that score. This will leave 1"
 Use a bone folder to fold on all scored lines and it should look like this.
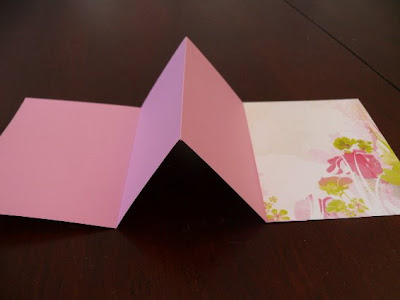 Glue the 5.5x4" pattern piece to the 1" flap.
Glue this inside flap together with a bit of glue.

It should look like this, at this point in the game.
 I would like to take this opportunity to show you a cute picture of our coon hound Marble who is on my studio floor begging for a belly rub. Isn't she the cutest?!
 Now is a good time stamp! (Actually "anytime" is a good time to stamp) I used this flowery/scrolly image from the "Contemporary Elements" set and Pink Petunia VersaMagic ink.
Stamp the inside as well, and the back of the flap. Basically anything pink will get stamped. Now we are going to make a window in the inside flap. I ran mine through the Cuttlebug using a scalloped oval Nestabilities die. Make sure you only cut out on the flap! You could also use a punch for this or any other cutting system.
 Walla!
 For the focal point image on the front of the card I am using our new unveiled Flower Of The Month stamp set, the Iris. It stamps out so crisp and clean!
 I colored mine with a blending pen and ink pads. If you have not tried it before you should! First you should know that a blending pen is basically a marker without any color, so you will need to add the color yourself. What exactly is in a blending pen?... good question. Like I said it is basically a marker and it contains among a few other things glycerin which extends the drying time of the fluid which means you have more time to move the color around before it dries on you. Use the blending pen to get a watercolor look without using all that water. Besides using ink pads to add the color you can use watercolor pencils, regular watercolors, and chalks... I am sure there are other mediums too that I can't think of at this moment. OK, enough of the blending pen lesson, let's color!
 The easiest ink to work with is dye based ink which is kind of like a marker too, but with out the glycerin and other things. To use your pad as a pallet, while closed squeeze the ink pad lid to the pad.
 When you open the lid you will see this, a pool of ink to dip your blending pen into. Use a light hand at first, as you can always add color but you can't take it away. Also remember that you want this to look like watercolor which means you need light and dark shades... you do not want it all one shade. For that you could just use a marker.
 Here is my coloring and you will notice I did not stay in the lines very well. Don't worry I will take care of that later.
 We are going to use the pink color now so we need to clean the blending pen out, and you do that by just coloring with it on scrap paper until it runs clear.
 I am going to use pigment ink now which will work fine but it will not be as crisp and clear as the dye ink. You could think of pigment ink as being more of a gel ink and is thicker than dye ink and takes longer to dry. I am just going to touch the blending pen to the pad itself.
 I started coloring from the inside of the petals outward so it would naturally have a darker shade inside the flower and lighter on the petals.
 Here it is finished.
 Clean out your pen after every use.
 To clean up my edges and to also make the image "pop" from the what paper a bit, I outlined it using a light gray marker.
 I cut this out using a circle die and glued it to a slightly larger scalloped circle.
 Now let's do some more stamping. First stamp the saying "Smiles are..." on the green strip and then "the soul's kisses" on the inside of the card (these are from the Happy Sayings set) and then the word "Smile" through the window. (from the Happy, Smile, Laugh set)
 Take the strip and corner round it on both left side corners.
 It should look like this.
 Round the edges of a slightly larger pattern paper strip and glue them together and then to the bottom right side of the card.
 It should look like this.
 Punch two small holes to run ribbon through.
 Let's make a cute little flower/ribbon embellishment. The ribbon will be the petals. First thing is to cut a length of sheer ribbon.
 Glue it to itself to make a loop. I just used my ATG gun for this whole thing, or you could use glue dots.
 Put some glue inside the loop and glue the middle down.
 Twist it and glue it down.
 Attach a brad inside a paper flower and then glue it onto your ribbon. Cute Hugh?
 This is the front of the finished card.
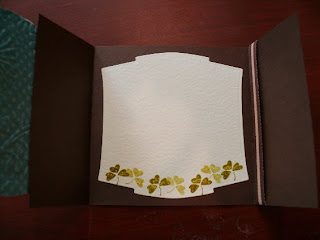
 Inside front.
 Inside back... you will notice that I added a paper tab and mini paper flowers.
 The back of the card.
I hope you enjoyed learning how to make this fun Flapper Card and will try it yourself.


 Run it through your Cuttlebug like normal.

