http://www.pinkcowdeals.com/Online_Deals.html
Thank you to whoever posted this recommendation about The Stamping Studio! I came across it web surfing this morning and was pleasantly surprised to see our company!
Wednesday, December 1, 2010
Tuesday, November 30, 2010
Fun project!
 Here is a fun project that you can whip out for the holidays... a tissue box cover. You can find the tutorial on splitcoaststampers.com.
I used our new stamp set "Pine Branch" and glittered it up and added rhinestones that I colored using my Copic markers.
 Here it is on display in my little guest bathroom.
 Friday, November 19, 2010
SALE! 50%-75% off Holiday Stamps!
 That's right! BIG Sale for you... all the rubber stamps in the online store section "Rubber Stamps, Holiday" are 50%-75% off! That includes all the new ones we just got in a couple weeks ago. This encompasses all the Holiday's not just Christmas.
Thursday, November 11, 2010
Christmas 2010 Stamps are Here!
The 2010 Christmas stamps are now available in the online store, Yea! I am so excited about the 4 sets and single image all from our artist friend Brooke Smith. She just has a wonderful style about her. Look below for the new images and then go to www.TheStampingStudio.com click on "Store" then scroll down to "New Rubber Stamps" and pick up your favorites. Stable #rssbs46 This set is sized to work with our very popular Nativity set... now you have a stable to put them in an a horse to boot!
 Squirrely #rssbs45 I love me a squirrel stamp now! How about you? This one has not only 2 squirrels to stamp and color but also peppermint, candy cane and a border stamp along with the saying. Perfect!
 Pine Branch #rssbs47 Nature sets are always very popular around here and here is another one to add to your collection. All the elements can be stamped separate to really make your project your own!
 Happy Christmas #rssbs48 I think this is one of my favorite sets in this series... it is a large set measuring 5.5x5 and comes with 10 images... yes 10! This style is similar to Brookes "Skys the Limit" set and has clean simple lines but enough details to make it special. Don't you love Brooke's handwriting?
 Baby Jesus #rssbs49 This is a single image that I think says it all without any words. Holding a heart, Jesus loves us. Simple and sweet, and how about glittering-up that heart?
 Stable #rssbs46 This set is sized to work with our very popular Nativity set... now you have a stable to put them in an a horse to boot!
 Squirrely #rssbs45 I love me a squirrel stamp now! How about you? This one has not only 2 squirrels to stamp and color but also peppermint, candy cane and a border stamp along with the saying. Perfect!
 Pine Branch #rssbs47 Nature sets are always very popular around here and here is another one to add to your collection. All the elements can be stamped separate to really make your project your own!
 Happy Christmas #rssbs48 I think this is one of my favorite sets in this series... it is a large set measuring 5.5x5 and comes with 10 images... yes 10! This style is similar to Brookes "Skys the Limit" set and has clean simple lines but enough details to make it special. Don't you love Brooke's handwriting?
 Baby Jesus #rssbs49 This is a single image that I think says it all without any words. Holding a heart, Jesus loves us. Simple and sweet, and how about glittering-up that heart?
Hope you all like the new images... it is going to be a fun stamping Holiday this year!
Friday, November 5, 2010
Card of the day 11/5/10
 Here is a double sided ornament card.
 A little heat embossing, a little sponging, a little sparkle and this is what you get!
Have a great weekend everyone and I hope you get a chance to stamp on something. :)
Thursday, November 4, 2010
Card of the day 11/4/10
 Here is another Christmas card for the workshop and notice the glittery bow around his neck?... that was done with the Sparkles Fibers... it looks much prettier in person and really catches your eye.
This stamp set is a "soon to be" set from artist Brooke Smith. These will be here next week!
Card/project of the day 11/3/10
 OMG! I just realized that I forgot to post the card of the day here yesterday... I posted it on The Stamping Studio Facebook page, but forgot to do it here. Sorry 'bout that. Here is a cute project that we are going to make at the upcoming Christmas Card Workshop.
  I colored this squirrel brown...
 And this one gray
 White and red stickles glitter glue on the candy cane!
Tuesday, November 2, 2010
Christmas Card Workshop
 Saturday November 13th at 10:00am is our Christmas Card Workshop here at the Studio. This is one of the most popular workshops and we would like you all to join us! We will be making 5 easy but super cute Christmas cards/projects. After you make the 5 projects, you will have the opportunity to make more of your favorite cards for a small supply fee... so you could come and get most of your Christmas cards made! We will also have a few giftie projects for you to make as well, for a small supply fee. On top of it all we will feed you... what more could you want? The workshop fee is $10.00, if you bring a friend just pay $5.00 each. The workshop will last until about 3:00 - 4:00pm, and longer if people are still busy stamping.
Where? The Stamping Studio is located at 1022 Choctaw Drive Lincolnton GA 30817, which is about 2.5 hours from Atlanta and 45 minutes from Augusta, 45 minutes from Greenwood SC.
What you need to bring? Bring your scissors, adhesive and all the supplies you use most when you are stamping. Some things I use a lot are; foam dots, paper piercer, pencil and ruler, etc...
Please RSVP by Friday Nov. 5th if possible. Give Melissa a call or email; 706-359-6387, melissa@thestampingstudio.com
But Melissa I have never been to a stamping workshop, what if I don't know how to make the projects or have the supplies? These projects are not going to be complicated and have written instructions on each table, also we have very helpful stampers that will be happy to help you, along with myself. As far as supplies, I have one of each tool, stamp, ink pad, marker etc... that you will need on the table for everyone to share.
I hope you will come and bring a friend, and please let me know if you have any questions at all!
Card of the day 11/2/10 & Sneek Peak!
 Isn't this a sweet card? I used my Crafters Companion to do the scoring and they call this a mini accordion card. My son David gave me the idea to to a window through the front.
Does the stamp look familiar? Well it shouldn't because it is a new image for us in a new stamp set from Brooke Smith. This set will be available soon, and I will keep you updated. It "will" be here for the Christmas Card Workshop Saturday Nov. 13th.
 Loving the BasicGrey Jovial pattern papers, and this is our new twill stripe ribbon.
Tuesday, October 26, 2010
New Products!
I just got through adding some great new items to the online store. I am really excited about how shiny, glittery and sparkly these all are. Diamond Dust is kind of like glitter but instead of being made from plastic it is actually ground up glass shards. This catches the light more for more sparkle appeal. Just use your favorite craft glue to adhere this.
 These are Sparkle Fibers and I would describe it more like sparkly fiber confetti. I am thinking it would look great added to snowflakes! Again, just use your favorite craft glue to adhere. Come in these 3 colors; disco ball, snow drift and blue icicle
 New ribbon! This is a 3/4 inch wide twill strip and it is light weight which is makes it easy to knot and tie bows with. 3/4" is just a little bit wider than most of our ribbon which tends to be 5/8"
 Diamond Dust is kind of like glitter but instead of being made from plastic it is actually ground up glass shards. This catches the light more for more sparkle appeal. Just use your favorite craft glue to adhere this.
 These are Sparkle Fibers and I would describe it more like sparkly fiber confetti. I am thinking it would look great added to snowflakes! Again, just use your favorite craft glue to adhere. Come in these 3 colors; disco ball, snow drift and blue icicle
 New ribbon! This is a 3/4 inch wide twill strip and it is light weight which is makes it easy to knot and tie bows with. 3/4" is just a little bit wider than most of our ribbon which tends to be 5/8"
The top color is pine green, and bottom is celery.
 Red and black.
 I am really excited about these new ribbons which May Arts calls Sparkle Velvet. It is not really soft like velvet but the texture is soft and easy to knot, and the other side is so sparkly you are gonna love it!
 Red and black.
 I am really excited about these new ribbons which May Arts calls Sparkle Velvet. It is not really soft like velvet but the texture is soft and easy to knot, and the other side is so sparkly you are gonna love it!
This white and brown
 Black and gorgeous gold
 Silver and dark silver, which is like a gun metal color
 Red and pine green
 Stickles have been very popular around here so I ordered a bunch of them this time around. They are cheap, easy to use and really give a great glittery-ness to your projects. At $1.95 for a bottle you can't go wrong!
We have Star Dust and Diamond above
 Silver and platinum
 Purple and Starry night
 Lime green and magenta
 Gold and cinnamon
 Silver and platinum
 Purple and Starry night
 Lime green and magenta
 Gold and cinnamon
Candy cane red and turquoise.
These are all available for purchase right now in the online store; www.thestampingstudio.com You can find ribbon in the Ribbon section, then Diamond Dust, Sparkle Fibers and the Stickles in the Beads and Glitters section of the store.
Thursday, October 21, 2010
Getting ready...
 Getting ready for the workshop on Saturday. David organizing the ribbon end-cap... he took me up on the offer of working for $1.00 an hour. Sean (his twin) decided to play basketball instead! Anyone else?
Card/project of the day 10/21/10
 Today's project is another paper pumpkin... a large one! I used the larges paper I had which is 12x12 and cut the strips 2x12, and used 2 sheets of paper to make 12 strips. I love it! What a great centerpiece
 David volunteered to be my model... isn't he cute?
 I used some glittered fabric flowers that we just got in for the top (you can see Saturday if you come to the workshop, or next week when I add to the internet store) and then satin ribbon loops, and those cool suede leaves from May Arts ribbon... they come attached to each other on a spool just like other ribbon and is $1.50 for 2 yards.
 Wednesday, October 20, 2010
Card/project of the day 10/20/10
 Todays project is a mini paper pumpkin (cute all by it self) with our cute turkey all colored and glittered, standing up against the pumpkin. A great project to decorate a desk or countertop!
Tuesday, October 19, 2010
Card of the Day 10/19/10
 Here is another card made using the Halloween Rounder stamp, along with the "middles" and the skull from the Halloween Fun set.
  Glitter on the gray skull makes it really stand out!
Monday, October 18, 2010
Card of the day 10/18/10
 Here is a fun Halloween card made using our Halloween Rounder (so versatile!), scrolls, and fun fabric ribbon bats. A little embellishiment and you have yourself a fun and easy card!
Stamp Club this Saturday!
Hi Stampers,
Don't you love this fall weather? I am excited to share with you some fun fall themed projects at the upcoming stamp club workshop this Saturday Oct. 23rd. We also have some fun new embellishments for you and those great clear treat boxes that you all wanted at the retreat last month that we used to make the marshmellow snowman. (project was posted on Facebook and the blog last month)
So that I can make sure to have enough supplies on hand, and the hostess know how much food to bring, please RSVP as soon as you can (like right now after you read this). I really appreciate it!
Don't forget to bring with you, your basic craft kit including scissors and adhesive... the rest of the supplies we will share.
I look forward to seeing all of you, and feel free to invite friends and family if you would like. (just let me know of course!)
Warmly,
Melissa
owner, www.thestampingstudio.com
melissa@thestampingstudio.com
706-359-6387
Monday, October 11, 2010
Card of the day 10/11/10
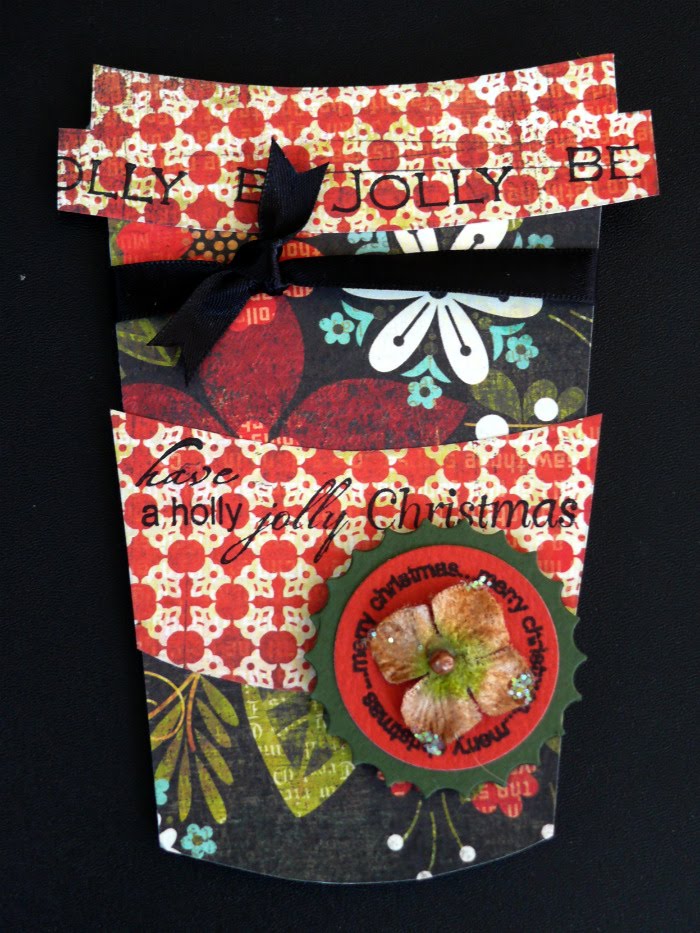 I can't seem to stop making these take out coffee cup cards!
  Here is one for the holidays made using our Sentimental Christmas stamp set that includes the rounder.
 I cut apart the saying "be jolly" and placed them on my acrylic block on a slight curve that works great around the rim of the card.
We are going to making a fall version of the this card at the next free workshop Oct. 23rd. Email if you would like to attend; melissa@thestampingstudio.com
Thursday, October 7, 2010
Card of the day 10/7/10
 Here is the take-out coffee cup card I told you about. This is a fall themed card using stamp sets; What's Brewin & Regular Joe. So many possibilities with this template!
  If you attend the next Stamp Club Workshop this month (10/23/10) you will get the template. It is not too early to RSVP for this workshop.
 I sprayed some white paper flowers with Glimmer Mists to match my pattern paper. I just love Glimmer Mists don't you? We just received a shipment of these in the studio the other day... although these colors above are from a couple years ago.
 Wednesday, October 6, 2010
Card of the day 10/6/10
 Yesterday got a little away from me (sorry no card of the day yesterday)... I unexpectedly was asked to run into the city to pick up supplies for the Cafe we have in town (Lincolnton) and then we had gymnastics, soccer practice for one boy, soccer game for the twins and then a onto the Cafe to celebrate the twins last game and that they were undefeated this year. Yea!
Here is one of Dionne's stamps from last year that is one of my favorites... it celebrates how we celebrate with a home cooked meal with family and friends. This was colored using Copic markers.
Monday, October 4, 2010
Card of the day 10/4/10
 Here is a fun little number made using the sets; Hidden Path (back in stock!) and Autumn Icons.
  This is a smaller version of the stair step card and you cut the base 4x6 and score it 1,2,3,4, and 5". Fold that all up and it is the base that you glue the other pieces too. For the scene I first rubbed VersaMagic ink onto white cardstock to make a background then stamped the image on top in brown ink.
 Stamp some leaves and cut them out, then stamp the word "Fall" onto white scrap, punch out with circle punch and rub with some more ink. Fun easy card!
Subscribe to:
Posts (Atom)