
Hey Stampers, and Scrappers,
I have another tutorial for you today,
View master Cards. I had made one of these when I first started stamping, so the technique has been around a while but now we have so many great punches and such to make the job easier. I really had fun with this one, and it was my Project Box project at the retreat.

Gather your supplies you will need for this project including;
4.25x11" cardstock for card base (orange)
5.25x4" purple cardstock
pattern paper strip
4" white cardstock circle
Mega scalloped oval punch,
2" circle punch (similar sizes will work)
paper piercer
brad
watercolor pencils
blending pen
StazOn jet black ink pad
stamp sets - Trick Or Treat, Halloween Fun and Harlequin Background

Stamp your
Harlequin background stamp onto your purple
cardstock using black ink.

Use the scallop oval punch to punch a hole new the top.


We need to poke a hole in the middle of the 4" white
cardstock circle and I made a template to make this easier for me. To find the middle of the circle, fold in half once, and then again... unfold it and you will see the middle.

Use a paper piercer to make your hole.

The circle will go behind the purple
cardstock.

So place the circle behind the opening, but the hole of the circle will need to be lower than the punched out oval. Once you get your placement poke a hole through the purple piece from behind.

Attach the two pieces with a brad.

Use part of the 2" circle punch to notch out a spot on the side, this will make it easier to turn the white circle and view the images.

This is how that should look.

Now you can stamp your images onto the white circle "Trick or treat smell my feet..."

Then the jack-o-
lantern treat bag.

Then "boo to U!"

Then the skull

Also stamp the trick or
treaters onto scrap white
cardstock. Now you can use your watercolor pencils to color all of the images in. I used one color for the base of the image and then went back with a darker color to make shadows.

Since the watercolor pencils are water soluble you can use your blending pen to blend all the colors together and get rid of of the pencil lines. The one on the right I used the blending pen on... it is a
sutle difference.

I also like to outline all my stamped image (colored or not) with a light gray marker. It really looks great... you should try it!

Now we need to glue the purple layer onto our orange card and to give it a lift, so that the circle turns easily, I used 3-D glue dots, or foam tape works well also. I just used them in the 4 corners.

We need to punch another notch in the top of the orange card. Just slip the punch in there to do that.
 Whala
Whala!

I added a pattern paper strip because it just needed "something" and this did the trick!

I had this great shred laying around and it was brown and earthy and thought it would match the card perfectly. (I bought this at the dollar store)

I
separated the strands of the shred and
layed down about 6-7
pieces criss-
crossy.

To make sure the shred stays down as well as the stamped images I used more 3-D glue dots on the back of the image.

And just
smoosh it all down to
adhere.

Give the shred a "hair-cut" and you are done! People love to play with this card... who wouldn't?! I hope you try this one out and remember that it can be for any theme you can think of not just Halloween.
 Hey Stampers and Scrappers,


 #14 Glue that to the front flap.


 #19 Add a ribbon.
 Here is some of the drink mix that you can just tear open and add to your water bottle for fun flavor. My husband bought this for me and said that you can get all different flavors and types. I think he said he paid about $2.00 for this box of 10.


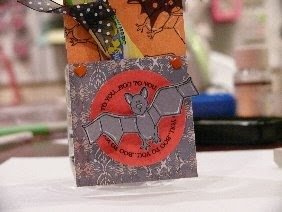 Here is that cute bat, and also more bat overlays.