Thursday, April 30, 2009
May Flower Of The Month
This new set is available in the online store www.thestampingstudio.com in the sections in the store; Rubber Stamps Flowers & Foliage, READY SET STAMPS, and Flower Of The Month.
Wednesday, April 29, 2009
Recipe - Chicken Spaghetti
CHICKEN SPAGHETTI
3 - 4 POUND WHOLE CHICKEN (CAN USE 3 CHICKEN BREAST AND SOME LEGS AND THIGHS) 1 WHOLE ONION
CHOPPED ONION
3 RIBS OF CELERY (SAUTE ONIONS AND CELERY IN 1 STICK BUTTER
1 CAN CREAM OF MUSHROOM SOUP UNDILUTED
1 CAN UNDRAINED ROTEL TOMATOES
1 CUP GRATED CHEESE
COOK CHICKEN SALT AND PEPPER AND WHOLE ONION IN WATER...TAKE CHICKEN OUT AND WHEN COOL, TAKE MEAT OFF BONES...SAVE BROTH
COOK 12 OUNCES PACKAGE OF SPAGHETTI NOODLES IN BROTH AND SAVE LEFTOVER BROTH...
COMBINE CHOPPED CHICKEN, CREAM OF MUSHROOM SOUP,AND ROTEL TOMATOES, ONIONS AND CELERY AND BUTTER THAT YOU SAUTEED IT IN...
PUT IN 9 X 13 PAN AND SPRINKLE CHEESE ON TOP COVER WITH FOIL.(IF A LITTLE DRY..CHERYL ADDS SOME OF HER LEFTOVER BROTH TO IT MAYBE 1/2 CUP)
BAKE 350 DEGREES FOR 25 TO 30 MINUTES LAST 15 MINUTES UNCOVER..
CAN ADD MUSHROOMS AND BLACK OLIVES...ENJOY
Friday, April 24, 2009
Mini Magazine Holder
Here is a peak at the 3rd project we are going to make at the workshop tomorrow. It is a mini magazine holder that is sized to hold cards and envelopes. Believe it or not... it is super easy to make. I was thinking that these could hold all sorts of things... how about scraps of card stock? Make one for each color of card stock you want to collect and organize. Or it could hold a couple mini scrapbooks, or a collection of photographs, postcards... almost anything. I better get back to getting ready for the workshop. The Studio is a bit of a mess!
Thursday, April 23, 2009
Sentimental Slide Card
Wednesday, April 22, 2009
Photo Stamps are In!!
I know we have not had new photo stamps in awhile so some of you might not be familiar with these but my best advice is to use StazOn ink (Jet Black and Timber Brown are especially nice) and glossy card stock. When they first arrive stamp them on scrap paper to get rid of any residue from the manufacturing process and then stamp on your glossy card stock, it may take a couple impressions to get just the right touch down but you will get it. I usually like to stamp the image 4-6 times to have them on hand since you have your supplies out already. Then let your ink dry thoroughly and tint with chalks. Looks great!
Tuesday, April 21, 2009
Make a Window Card at the Workshop
Here is a cute little window card that I came up with that we are going to create at the workshop on Saturday. Here is the front, and it actually has 3 layers.
Here is a top view that shows you all three layers.
Here is the 2nd layer which is a piece of scored cardstock glued inside the card.
This is the 3rd layer, or inside back of card.
The top layer has a layer of acetate for a "true" window effect!
We will also be adding swarovski crystals for tons of shimmer and shine!
Photo Stamps on there way!
Our new photo stamp sets shipped out yesterday and are scheduled to be here either Wednesday or Thursday. Yippee! We are going to be stamping with these Saturday at our Stamp Club workshop. I will let you know when these arrive and are available in the store.
We still have spots available for the workshop, so if you would like to come please email or call me - melissa@thestampingstudio.com (706) 359-6387.
Also... I will be unveiling the new Flower Of The Month stamp set early for the workshop guests so that is another reason to attend! We just got in the Lights collection of Adirondack dye ink pads and these will be available as well, and I will be adding them to the online store as soon as I can... this week is a bit busy for me with Husband out of town and lot's of boys activities; chiropractor for Alec (injured his tailbone) then piano and guitar lessons and then the twins first baseball game... and that is just "today"!
Friday, April 17, 2009
Photo Stamp Set Sneek Peak #4
Good morning stampers and scrappers,
Here is our final Photo Stamp set Sneak Peek, Horse Collection. This is a beautifully photographed 3 image set that is just begging to be stamped with! As with all of these new sets I had card making in mind, and chose photographs that would make perfect cards for almost any occasion. "Manly" cards are sometimes hard to design and I think these horse images would be perfect for that. I must have Mothers Day on the brain... but I think the Mother horse and foal image would be wonderful that holiday don't you?
I created some cards using yesterdays preview photo stamps and you can view them and others here http://www.papercraftplanet.com/photo/albums/tss-photo-stamps
These are over at Paper Craft Planet, you are also invited to join The Stamping Studio group at the same website here http://www.papercraftplanet.com/group/thestampingstudio we would love to have you join in all the fun!
Mother and foal - 1.75x3
Thursday, April 16, 2009
Photo Stamp Set Sneek Peak #3
Wednesday, April 15, 2009
Photo Stamp Set Sneek Peak #2
Tuesday, April 14, 2009
Photo Stamp Samples
Paper Craft Planet
If you have not checked it out before, Paper Craft Planet is a great online community for people just like me and you! It has great ideas, tutuorials, and videos.
We would love to have you part of our group in which we will be hosting challenges and giving inspiration using our TSS (The Stamping Studio) stamps!
Photo Stamp Set Sneek Peak #1
It has been awhile since we release new photo stamps and I am so excited to have new images to work with! For those of you who have not stamped with "photo stamps" before, they are so much fun and with the right inks and papers, they end up looking just like a photograph. What is even better is the wonderful looks you can get by coloring in the images with chalks... it looks just like photo tinting!
We are releasing 4 new sets that contain 3 or 4 photo images in each set. They all have a different theme and today's Sneak Peek theme is "Birthday Dogs". These images work wonderful together to make unique and FUN birthday cards. The look on this little pugs face is just priceless isn't it? These should be here and ready to ship in about a week... and I will keep you updated when I get shipping information. Check back tomorrow for another Sneak Peek!
Birthday pug - 1.5x2.75
Saturday, April 11, 2009
Shadow Box Card Tutorial
You will need two pieces of pattern cardstock cut 4.25x5.5.
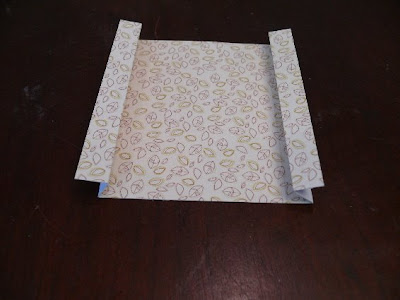
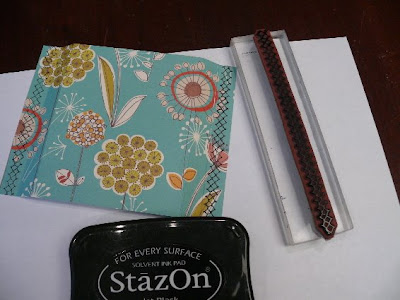
You will also need a piece of clear cellophane. I just cut a piece from the clear envelope/bag that our rubber stamp sets come in and it worked great!Take your cardstock and on the short side score it at 1"...And then at 1/2"...Do this at both ends, and also score the other piece of pattern cardstock. Both pieces of cardstock are scored exactly the same way.Take a bone folder and crease all of the folds.The top of the card should be scored like this.The bottom piece like so.Don't glue them together yet!... but this is how they will fit together to make the card.Now is a good time to stamp both ends using one of the images from the Fancy Stitches set and black ink.We need to cut an opening through the front of the card so we can see inside. You can do this many ways... die cuts, punches, cutting systems. I am using the Labels 2 dies from Nestabilities.Whala!This is optional, but I wanted a frame around my opening on the front of the card so I am going to use the dies again from the Nestabilities (I can order these for you) to create one real easily. First you use the die that is one size up from the one you used to create the opening in the front of the card.
Then use the size smaller inside this piece and die cut it out again. (I like to use my Cuttlebug with these dies, but you can use any similar die cut machine press)Here is the finished frame that you can glue to the front of the card.Looks good good and adds some more dimension.Now is a good time to glue the clear cellophane to the inside of the front of the card. I just used double sided adhesive for this.Now we can work on the inside of our card. I am using VersaMagic chalk in here in those cute little Dew Drop pads. Here I am stamping clouds (from the A Little Bird set) in Turquoise Gem ink.Over stamp the clouds with the saying from the Musical Quotes set and black Stazon ink.Also stamp a couple clouds on white scrap cardstock using Pumpkin Spice ink and trim out. We will use these in a little while.Now let's stamp the main image which is the bird sitting and singing on this great guitar image. This is also from out new Musical Quotes stamp set. The small Dew Drop pads are great for working on an image like this. First ink up only the notes from the birds mouth using the Turquoise Gem ink.Then ink up only the bird using the Pumpkin Spice ink.Third and final color is Jumbo Java for the guitar.Looks great stamped out! If you wanted the guitar image darker and more solid, add a drop or two of re-inker to your pad each time you use it. Trim this image out.Take one of those Pumpkin Spice clouds you trimmed out earlier and use either foam tape, or a 3d glue dot to glue inside your card as shown. Now you can glue the guitar/bird image to the front of the card right over the cellophane and all. I used Glossy Accents/Crystal lacquer for this but any good glue will work.You can take the other cloud and use foam tape to glue it to the outside of the card for some more 3D action!Now we can glue the card together! Place glue on the outside score lines, on each side, to glue together. Add some paper flowers and a bit of ribbon and you are done!
I hope you have enjoyed this tutorial and project. It is a pretty easy design and can be adapted to any theme or celebration and what is great about the card is that it fits in a normal size envelope for easy mailing.
Please email if you have any questions about the tutorial - melissa@thestampingstudio.com
Melissa is the owner of www.TheStampingStudio.com