 Let's make this fun Purse Folio! It is made from two square envelopes and you can either make it into a mini scrapbook or have it hold square cards.
  Start out with two square envelopes. I had white 5.5 on hand so used those, but colored envelopes would be pretty too.
Cover the outsides of the envelopes with pattern paper 5.5x5.5. I am using our new Canta paper pad from GCD Studios. You can't see it but this pattern has black glitter on it. The paper is also double-sided which is great for other elements in this folio.
 Also cover the other side of the envelopes with pattern paper 4.25x5.5.
Use a circle punch, half way to punch out a tab to make sliding things inside and out of the envelopes easier. Take a piece of 5.5x5.5 piece of pattern paper and fold it in half and glue the flaps to it. The flaps should be glued to the backside of the pattern paper.
 Here is what that should look like.
 Then you can decorate the insides of your folio however you would like. I used our new FOTM image Cabbage Rose and colored it using regular color pencils and added some shimmer with a Stardust glitter pen.
 I stamped out Blessings Rounder on some pattern paper and die cut it out using scalloped circles Nestabilities, and added a circle of pattern paper inside that.
 You can also decorate the binding piece. I stamped the Thoreau Quote on more pattern paper and die cut out other pieces and a photo of my wonderful sister in-law Linda. This purse I am making for her using some great photo's they took of her and her children on Mother's day. I had to make a keepsake for her with them!
 This is going to be the flap for the purse. You can use a circle or oval or a plain rectangle shape for this. I used the large die from the Curved Rectangle Nestabilities and then scored it at 1.5" on the long side.
 On the short side of the flap place two large eyelets.
 Thread ribbon through the eyelets and glue the tails down flat.
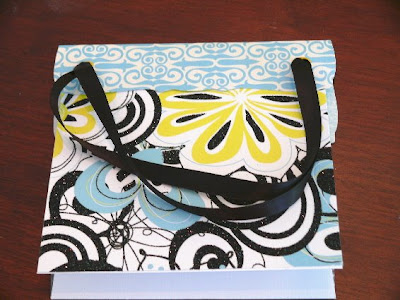 Glue the short flap only, to the back of your purse. It will fold over the front side and keep your purse together.
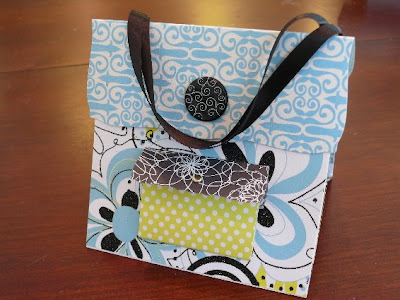
 This is how your purse should stand up. Cute hugh?!
 I thought it would be fun for my purse to have a small pocket on the front. So I made that with a rectangle of pattern paper cut 2.75x4.25 and a smaller die cut of the same Nestabilities I used for the purse flap.
 You can, of course, stamp the inside of your small flap.
 Here is what that looks like.
 I also added a small gold snap to add to the "cute-ness factor".
 Like I said I am making this into a mini scrapbook for Linda so I made some pages by gluing two pieces of 5.5x5.5 of pattern paper together. If I used pattern "cardstock" which is heavier I would only use I sheet of double-sided paper but I wanted this to be sturdy.
 To make pull out tabs for the scrapbook pages I stamped the Mini Rounders on pattern paper and die cut out using circles, and then more pattern paper using scalloped circles.
 Fold these in half before you glue them will make them lie flat. (As opposed to gluing them and then folding... it does make a difference!)
 Glue those onto your pages.
 Add cute photo's.
 Add photo's to the back side of the pages as well.
 I decided my purse was not glitzy enough for I pulled out some "bling" rhinestones.
 Paper flowers with my rhinestones look "FAB" don't you think?
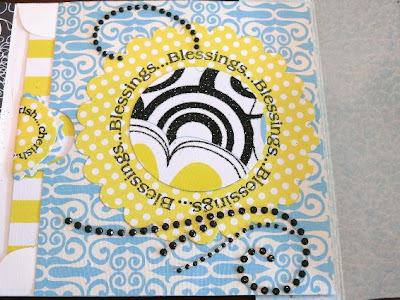 And more...
 Once I started I could not stop! I hope Linda likes it, and I hope you will try and create one yourself!
Take a piece of 5.5x5.5 piece of pattern paper and fold it in half and glue the flaps to it. The flaps should be glued to the backside of the pattern paper.Here is what that should look like.Then you can decorate the insides of your folio however you would like. I used our new FOTM image Cabbage Rose and colored it using regular color pencils and added some shimmer with a Stardust glitter pen. I stamped out Blessings Rounder on some pattern paper and die cut it out using scalloped circles Nestabilities, and added a circle of pattern paper inside that. You can also decorate the binding piece. I stamped the Thoreau Quote on more pattern paper and die cut out other pieces and a photo of my wonderful sister in-law Linda. This purse I am making for her using some great photo's they took of her and her children on Mother's day. I had to make a keepsake for her with them! This is going to be the flap for the purse. You can use a circle or oval or a plain rectangle shape for this. I used the large die from the Curved Rectangle Nestabilities and then scored it at 1.5" on the long side. On the short side of the flap place two large eyelets. Thread ribbon through the eyelets and glue the tails down flat.Glue the short flap only, to the back of your purse. It will fold over the front side and keep your purse together.This is how your purse should stand up. Cute hugh?! I thought it would be fun for my purse to have a small pocket on the front. So I made that with a rectangle of pattern paper cut 2.75x4.25 and a smaller die cut of the same Nestabilities I used for the purse flap. You can, of course, stamp the inside of your small flap.Here is what that looks like.I also added a small gold snap to add to the "cute-ness factor".Like I said I am making this into a mini scrapbook for Linda so I made some pages by gluing two pieces of 5.5x5.5 of pattern paper together. If I used pattern "cardstock" which is heavier I would only use I sheet of double-sided paper but I wanted this to be sturdy.To make pull out tabs for the scrapbook pages I stamped the Mini Rounders on pattern paper and die cut out using circles, and then more pattern paper using scalloped circles.Fold these in half before you glue them will make them lie flat. (As opposed to gluing them and then folding... it does make a difference!) Glue those onto your pages. Add cute photo's.Add photo's to the back side of the pages as well.I decided my purse was not glitzy enough for I pulled out some "bling" rhinestones.Paper flowers with my rhinestones look "FAB" don't you think?And more... Once I started I could not stop! I hope Linda likes it, and I hope you will try and create one yourself!
4 comments:
Great tutorial....love this project...too cute....just makes a great gift !!! Thanks for the hard work and time that it took to do this tutorial.You are the BEST!!!
forgot to say...love the paper...that touch of black is just the bomb...
What a wonderful idea! Beautiful. Thanks for sharing!!
smiles,Deena
What an awesome tutorial! I'll have to try it out!
Post a Comment