I have a fun and easy tutorial for you today: Water Bottle Hanger. I got this idea from Cheryl Bowdon's project box that she did for our Sramping Retreat last weekend. We got so many great idea's from everyone that I can't wait to do it again next year!
This is a hanger that slips around the top of a water bottle and holds a drink mix that you add to the water bottle. Such a great idea that I think I am going to do this for my twins birthday party next month. I can just see these all lined up, bright and colorful, on a table for the party. My twins love the idea when they saw it last night and will not doubt want to help me make them.
Here is how to make this fun and easy project.

 #1 Cut your base paper 2.5x11", a coordinating piece (gray) 2.5x2.5" and then a couple scraps.
 #2 On one side score your paper 2".
 #3 Score the other side of the paper 2.5"
 #4 Cheryl used a 1.5" circle punch on her project, but I did not have one so I used my 2" square punch, which worked great. You will punch the end that is scored at 2".
#5 Stamp the corner image from the Halloween Fun set, and then some great spider webs from the Trick Or Trick set all in black.

#6 Now take the 2.5x2.5 gray piece and let's stamp a fun background. First stamp the bat from the Halloween Fun set.

#7 Then stamp the saying "Boo to U!" from the Trick Or Treat set.

#8 Then stamp the skull from the Halloween Fun set, and fill in all the areas that look empty.

#9 I added highlights with the Inkssentials white opaque pen. This shows up great on this BasicGrey Ambrosia paper!

#10 Glue this piece to the front flap.

#11 Attach two brads (love these from Queen & Co.) on both corners of the flap to keep it in place.

#12 Stamp the Halloween Rounder from the Fabulous Fall set onto some scrap paper with black ink.

#13 Now take a 2" circle punch, turn it over, line it up and punch the image out.
 #14 Glue that to the front flap.
#15 Stamp the skull image (don't you love this image... not too scary but not too cute!) onto white paper, cut out and then use a glue pen all over the front.

#16 After applying glue sprinkle glitter over it, and now you have a "blinged out" skull.

#17 Use a 3-D glue dot to adhere your skull inside the Halloween rounder.

#18 Too cute!
 #19 Add a ribbon.
 Here is some of the drink mix that you can just tear open and add to your water bottle for fun flavor. My husband bought this for me and said that you can get all different flavors and types. I think he said he paid about $2.00 for this box of 10.


Here is a slightly different one with a red glittered skull, and I used the skull for the background stamping as well.

I cut off the jaw of the skull and let it hang on this design, I also added some fun clear overlays from Little Yellow Bicycle that we have in the store.

Here is a Bat design with the bat stamp used for the background and the focal point image.
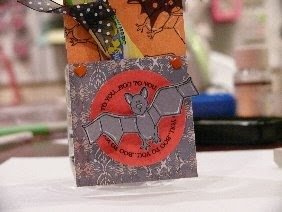 Here is that cute bat, and also more bat overlays.
Thank you Cheryl for the great project!, and I hope you will all try this one for your next party or event!
2 comments:
This is such an adorable idea! Great job!
Glad you like it Suzann! I visited your blog today and am glad that you are back home but the devestation from the hurricane sounds terrible.
Post a Comment